
Table of Contents
What is LTL/Partial Load & Manifest Load?
In LoadOps, you can create partial/LTL (Less than truckload) loads using the "Partial" load type. You have the option to haul a partial load individually like an FTL load or combine multiple partial loads into a special full truckload called a Manifest. A Manifest can be transported by a single driver or split into multiple trips, with each trip being carried by an individual driver.
Creating a Partial Load
When creating a new load, you have the option to tag it as a "Partial" load. Additionally, you can update the load type of an existing load to "Partial". It's important to note that we require a minimum of two partial loads in order to create a manifest.
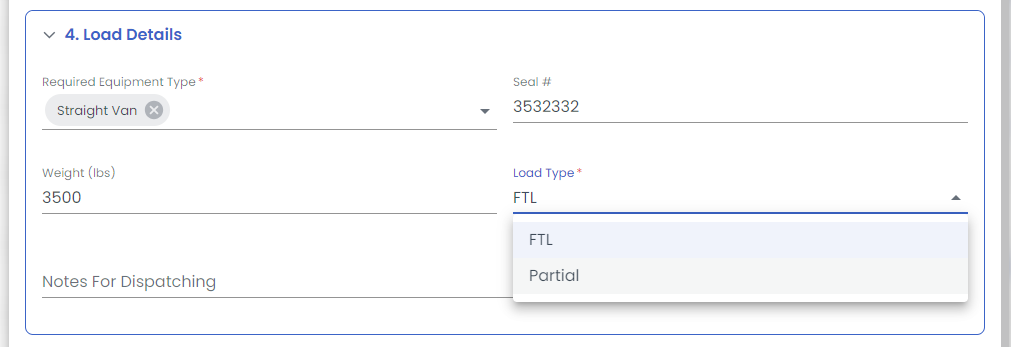
Creating a new Partial Load
In the load creation page, under Load Details, the load type can be selected as "Partial"
Modifying an existing FTL to a Partial Load
Creating a Manifest
To create a manifest, simply select multiple partial loads from the load page. However, there are some rules to keep in mind when merging partial loads to a manifest:
- Only partial loads can be merged
- Two manifests cannot be merged together
- Each load can only be a part of one manifest
- Loads with split trips or certain statuses (Paid/Invoiced/Completed/Canceled/Dispatched/In Transit) cannot be merged
- Completed manifests cannot be merged with another load.
Partial loads can be added to an existing manifest. Select the manifest and other partial loads from the checkbox in the load list page and click on the action "Add to Manifest".
Once you click on "Create manifest", you will see the "Add to Manifest" panel where you can select equipment and calculate KPIs. Additionally, stop details will be displayed and loads will be arranged in sequential order by default.

Users have the option to re-sequence stops with the use of the arrow up & down buttons.
Re-sequencing rules
- Resequencing of stops on Manifest cannot alter the relative position of the original load stop. Only the relative sequence of different stops can be modified.
- If the next/previous adjacent stop is completed/canceled/arrived/En-route, then resequencing to the direction of the adjacent stop is not allowed
- Re-sequencing is not allowed for the stop with status = completed/canceled/arrived/En-route
- A trip stop cannot be resequenced to become the terminating first or last stop of a manifest.
Once you create a manifest, it will be displayed on the load's page as a unique type of load called "Manifest". To access the manifest, simply select it and the manifest panel will open.
Manifest Detail Panel
A manifest panel has three tabs- Overview, Routes, and Finance
Overview tab
On this tab, you can see an overview of the manifest and the load details. Additionally, you can remove loads from the manifest from this page.

Routes Tab
The routes tab provides a comprehensive display of all the stops included in the manifest. It also provides detailed information about the various trips that can be used to transport the shipments.
You can split a manifest trip by adding relay stops, creating additional trip stops, assigning trips to drivers or assets, or re-ordering, just like you would with loads.

Finance
The finance tab provides an overview of the load invoices and trip expenses. Invoices are separated on a per load basis, and trip expenses can be expanded and modified here.
Finance - Managing Revenue Share
Manifest Statuses
A manifest can be in the following statuses: the table below provides details on each one.
| Status | Description |
| Available | Status is borrowed from the first trip of the Manifest. |
| Planned | Status is borrowed from the first trip of the Manifest. |
| Assigned | Status is borrowed from the first trip of the Manifest. |
| Dispatched | Status is borrowed from the first trip of the Manifest. |
| In Transit | If any stop of the load has any progress status (en route or arrived,). |
| Completed | The last associated trip of the manifest is completed. |
Manifest Actions
The status of a manifest can be changed using the menu button on the top right-hand corner of the manifest panel. Use the guide below to see which actions are available for each status.
| Action | Visible for the following Statuses |
| Assign to Driver | Planned |
| Revert to Plan | Assigned |
| Revert to Available | Planned Assigned Completed |
| Dispatch | Assigned |
| Un-Dispatch | Dispatched In-Transit |
| Mark as Complete | Available Planned Assigned Dispatched In-Transit |
| Delete | Available Planned Assigned Dispatched In-Transit Completed |
Partial Loads & Manifests on the Load Section
- Partial Loads and Manifests are displayed on the load page as "Manifest" and "Partial." The "Load Type" Column will show either FTL, Partial, or Manifest.
- The partial load's detail panel has a "Manifest ID" link. This link can be selected to view the Manifest Panel.
- The "Load type" filter can be used to search for FTL, Partial loads, and Manifests.
- The "Manifest ID" Filter can be used to filter loads by the Manifest ID.
- The "Manifest" & "Load Type" Column can be hidden using the table settings
Partial Loads & Manifests on the Trips Section
- Trips will have dual relations with Manifest and Loads. The trip detail panel has a "Manifest ID" link. This link can be selected to view the Manifest Panel.
- The "Manifest ID" filter can be used to filter trips by the Manifest ID.
- The "Manifest" & "Load Type" Column can be hidden using the table settings