
How are loads added to LoadOps?
There are currently six different methods of adding loads ranging from manual data entry to electronic data import.
Manually Creating a Load
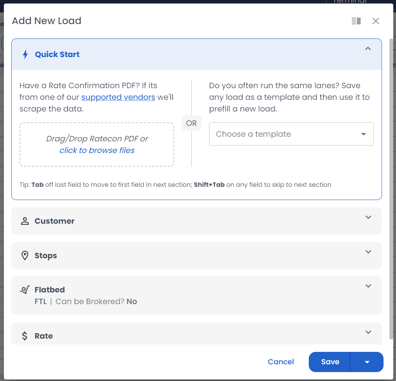
Go to Loads>Loads, click on the "Add Load" button in the upper right corner, and manually enter the load information. Note that selecting some fields might reveal additional information, such as Reefer Run Mode when selecting Reefer equipment.
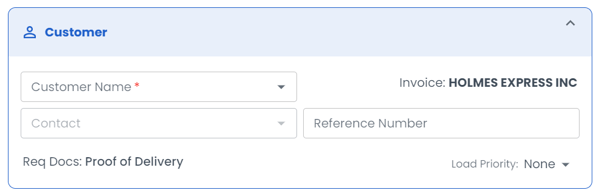
Start by adding your customer information. If this is a new customer not currently in LoadOps, it will automatically create a new record for that customer in your contacts. You can also select if Proof of Delivery and Bill of Lading are required on the load.
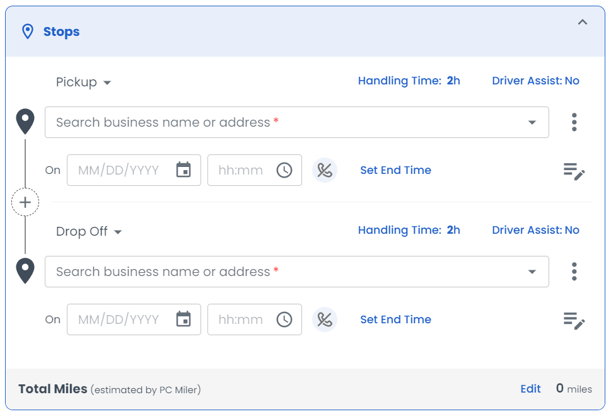
When creating stops, you can select an existing business name and address that has already been created in LoadOps or manually enter an address.
The phone icon represents whether an appointment is required or has been confirmed. By default, it will start at "No Appointment Required".
Additional notes for each stop can be added by clicking the pencil/pad icon on the right of each stop.
Mileage is automatically calculated by PC Miler, but you can select "Edit" in the bottom right to manually enter the mileage if preferred.
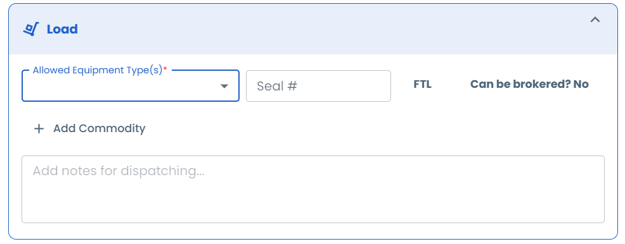
Select the equipment required for the load along with some additional details here. Note that some equipment types may have additional selections such as Reefer equipment revealing options for Reefer Run Mode and required temp.
Finally, enter the rate data for the load whether it's a flat rate, per loaded mile, or by loaded weight. Mileage and weight will be added here and calculated automatically if previously provided under the stops section or via the commodity on the load section.
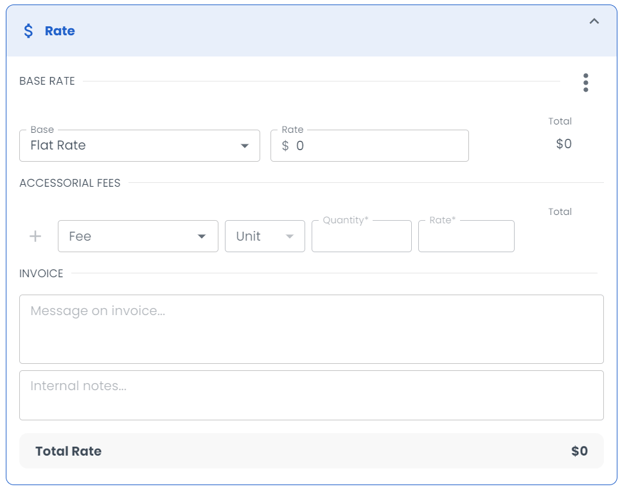
You can create the rate from an existing contract. Click the link to learn more!
Load Templates
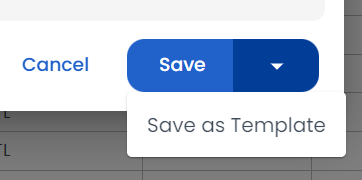
Save time by creating a template that includes the customer info and stop information you use most often. Click the arrow next to "Save" near the bottom and select "Save as Template".
Remember to choose an easy-to-remember name for your template!
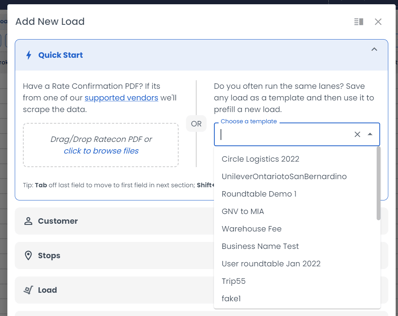
All your saved templates will live in the "Choose a template" dropdown and can be easily accessed next time you create a load.
Go to Loads>Templates to delete or make edits to existing load templates.
RateCon Extraction
LoadOps also supports RateCon extraction, which allows you to upload your rate confirmation and have the details automatically pulled into the load details.
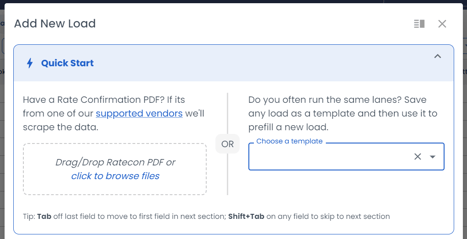
Not all RateCons are accepted- if you have ratecons that aren't on our supported list, send 4-6 copies to our support team and we can create mappings for them.
Import
The LoadOps import tool can be used to enter a large number of loads in a single upload. Go to Settings>Import>Load to add Loads or click here to read our import article.
LoadBoard
After one or more loadboard integrations are enabled, loads will be pulled into LoadOps and can be viewed in the loads>loadboard tab. Follow the guide below to learn more.
Creating a load via the LoadBoard integration does NOT interact with the broker. Ensure that you have properly booked the load with the broker when adding to LoadOps.
EDI
LoadOps EDI enables carriers to exchange information electronically with other businesses & Shippers.
With this feature, carriers can view loads shared via EDI, book or reject loads, and send shipment status updates. EDI also includes automatic load creation in LoadOps, which eliminates manual data entry and results in a more efficient and streamlined shipping process.
Read the full EDI Article here: