
Table of contents
Overview
In LoadOps, Trailer specifications and registration information can be entered and managed using the equipment module.
Adding Trailer
Go to Operations>Equipment>Trailer>Add Trailer to add a new trailer in LoadOps.
When adding a trailerr you will be able to note the following:
- Registration details
- Tracking
- Ownership information
- trailer details
- Insurance information
Follow the below guide to learn how to add Trailers in LoadOps.
Trailers can also be added via import. This is helpful when adding many trailers in bulk. If you would like to learn about importing, you can view our importing article here.
Trailer Management
Statuses
A trailer can be in one of four statuses. Select the menu options from the trailer side panel to change the status of a trailer.
| Trailer Status | Description |
|
The trailer is not assigned to a driver or is being used on a current trip. |
|
|
The trailer is either on an active trip or has been assigned to a driver. |
|
|
This is a manually selected status and prevents the Trailer/trailer from being assigned to a trip. Best used for a trailer undergoing maintenance or repairs, but will be put back into operation in the future. |
|
|
This is a manually selected status and prevents the Trailer/trailer from being assigned to a trip. Best used for a trailer that is no longer with your organization. |
Trailer Filtering
On the Trailer page, Trailers can be filtered by the options below
| Name | Status | In Transit | Safety Issues |
| Driver Name | Vin# | Reg. Plate | Reg. Expiry |
Learn more about table settings & filters in our help article here.
Trailer Detail Panel
General: Used when creating or editing the general details of a piece of the trailer. The general tab contains the following:
- Driver Assignment: If the Status of the Trailer is available, you can assign a driver by clicking on Assign Driver under the General tab.
- Registration: Under the Registration, Trailer # is mandatory, you can also enter VIN#, Registration #, State, Reg. Expiry Date
- Tracking: This is used to track the location of the trailer. Enter the Location and select from the dropdown, you can also enter the Odometer, Source, and Last Updated date.
- Ownership: You can enter the ownership details like the owner's name, phone #, email, and address, you can also select whether the Trailer is Owned, Leased, or Contracted.
- Trailer Details: Enter the Trailer Details like Make, Model, Year, Toll, and Fuel Details
Select Sleeper Berth if the Trailer is used for planning overnight trips.
Select Manual Transmission if the gears are selected by operating a gear stick and clutch. - Insurance: You can enter the Insurance Provider, Validity as well as upload a document.
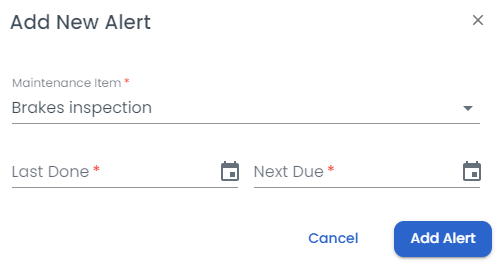
Alerts Tab: Used to add important alerts for the trailer. If you don't see the alert type you wish to add, a custom alert type can be created under Settings>Alerts.
Click on the "+" button to add alerts which brings up the add new alert
Select the Maintenance Item from the dropdown, Enter the Last Done and Next Due Date.
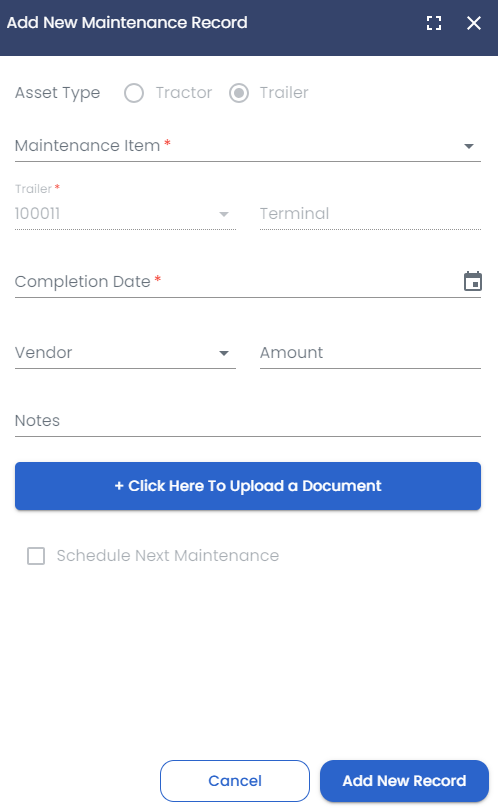
Maintenance: Maintenance events can be added manually and are logged for record-keeping purposes.
Click on the "+" button to add Maintenance Item which brings add new maintenance record screen.
Verify the asset type by default is Trailer and the trailer id is greyed out
Select the Maintenance Item from the dropdown, and enter the Terminal and Completion Date
You can also select the Vendor, enter the Amount, and write Notes, if any
You can also upload a document, select Schedule Next Maintenance
More Questions? Visit our User, Driver & Trailer FAQs article to learn more!