
Table of contents
Overview
Loads represent the commodities and income associated with transportation. In LoadOps, Loads are created by users, have an origin+destination, can be assigned to drivers, and more.
Load Panel Tabs
Selecting a load brings up the Load detail panel which allows users to view details, and modify the load. The top status section of the load panel displays the following:
Load ID- The ID of the selected Load
Load Status- The current status of the load.
Menu Actions- Available statuses the load can be changed to, as well as the option to delete the load.
Expand button- Expands the detail panel to full-screen and shows three tabs side-by-side.
Exit button- minimizes the load detail panel
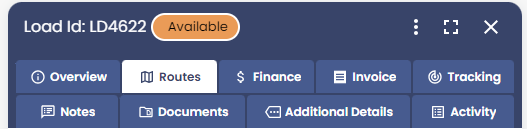
The Load detail panel has nine tabs with different functions.
| Overview tab | Routes | Finance |
| Invoice | Tracking | Notes |
| Documents | Additional Details | Activity |
Overview Tab
As the name implies, this tab provides an overview of the load details such as the load mileage, customer, and dispatch information.
- Warning Messages (If applicable): This tab displays warning messages related to Driver Assignment, Delays at stops, Invoice payment, driver certificates, trailer /tractor maintenance, etc.
- Load KPIs: This section describes the total Loaded miles, empty miles, total revenue, and revenue per mile for the load.
Load Details
Load ID: The ID of the load.
Reference #: This number is automatically generated from the rate confirmation document. However, users also have the option to update this field for their own reference.
Pickup: Pickup Location: The address where the load is to be picked up from.
Drop-off: Destination Address: The drop-off location for the load.
Customer Name: This section displays the name of the customer who has requested the load service.
Primary Contact: This section displays the name & phone number of the customer for easy communication and coordination.
Invoice Terminal: This section displays the name of the terminal associated with the invoice.
Factoring Company: If applicable, this tab notes the factoring company associated with the load.
Only the Load ID, Reference number, & Invoice number can be edited on the overview tab.
Routes
The routes tab provides a comprehensive display of all the stops included in the load. It also provides the ability to assign assets and manage the trips required to ship the load.
KPI: The Routes tab shows 2 KPIs:
Loaded miles: Sum of all the loaded miles for the loads selected
Number of stops: This section shows the number of stops a load has.
Dispatch sheet: A Dispatch sheet is a shareable record of the operational load details. It includes times, trips assigned to drivers, identification numbers, dates, and other important information.
Dispatch sheets be sent via email, downloaded, and previewed by simply clicking on the drop-down button for Dispatch Sheets.
Map view: The map view provides valuable information about the driver's direction and location. By hovering over the lines on the map, you can see details about the pickup and drop-off locations.
An upward arrow (⬆️)indicates the pickup location details, while a downward arrow(⬇️) indicates the drop-off location details. This feature helps you stay informed about the progress of the load and the driver's whereabouts.
Trip Dispatch section: from here a trip can be brokered, or assigned to internal assets.
Trip details: A load can be split into 2 or more trips and each trip can be assigned to different drivers, dispatchers, trailers, and tractors.
Click on the down arrow 🔽 next to the Trip ID to expand the trip details.
Click on the right arrow ▶️ next to the pickup/drop-off location to expand to see the details like Total drive time, EDT, Handling time, Total Drive time, etc
Click on the down arrow 🔽 next to the pickup location to re-sequence the trips.
The pick-up and drop-off location can be edited by clicking on the pencil icon✏️
Add a stop: To add a stop to the load, simply click on the "+" button located between the pick-up and drop-off locations.
Load Relay: You can split a load by adding relay stops, creating additional load stops, assigning loads to drivers or assets, or re-ordering. Please go to Load Relay to learn more.
Update Progress: To update the progress of a load, simply click on the clock symbol. Please note that this option is only available for dispatched loads. The user can mark the activities of the pickup and drop off of a load.
Finance
The finance tab provides an overview of the load invoices and trip expenses. Invoices are separated on a per-load basis, and trip expenses can be expanded and modified here.
Net Invoice: Net Invoice=Invoice Total-Factoring Charge. Please go to Invoice to learn more.
Total Revenue Share: If a load is relayed, the revenue share and revenue distribution % for both of the trips can be changed by clicking on Change Revenue Share
Driver Revenue Share: When the driver is assigned to a load the Payment is generated automatically based on the Payment term (if any) set for that driver.
Click on the name of the driver to see the driver revenue share details. This section is editable and can be deleted by clicking on the 3 dots next to the amount.
A line item can be added to additional payment to a driver by clicking on the + Add Line Item option
Dispatcher Revenue share: Just like Driver's revenue, when a dispatcher is assigned to a load the Payment is generated automatically based on the Payment term (if any) set for that driver. If a payment term is not added, it can be added in this section.
Click on the name of the dispatcher to see the dispatcher's revenue share details. This section is editable and can be deleted by clicking on the 3 dots next to the amount.
Add Line Item: A line item can be added to additional payment to a driver by clicking on the + Add Line Item option.
Trailer/Tractor Revenue Share: like Driver's revenue, when a Tractor is assigned to a load the Payment is generated automatically based on the Payment term (if any) set for that Tractor. If a payment term is not added, it can be added in this section.
Click on the tractor # to see the Tractor's revenue share details. This section is editable and can be deleted by clicking on the 3 dots next to the amount.
A line item can be added to additional payment to a driver by clicking on the + Add Line Item option.
Total Money In: This refers to the total amount of money received from the invoice for a load. It represents the net amount after factoring charges have been deducted.
Total Money Out: This includes the total amount of money paid out to the driver, dispatcher, and tractor for their respective shares in the load.
Invoice
The invoice tab allows you to add revenue line items, note payments, Factoring information, and more.
Warming massage: This tab displays the warming message related to missing documents.
Invoice Actions
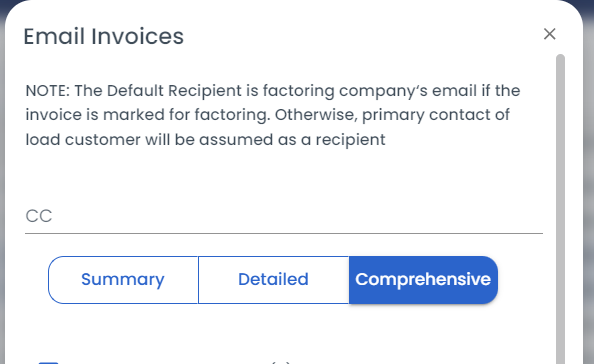
Email the invoice: simply click on the email symbol. You can customize the body of the email and choose which attachments to include.
Invoice Details: The invoice provides detailed information about the load and offers three levels of detail: Summary, Detailed, and Comprehensive. By default, the Comprehensive invoice is selected, but you can choose any level of detail before sending the email invoices.
Download Invoice: If you prefer to have a copy of the invoice on your device, you can easily download it by clicking on the download symbol.
Preview Invoice: Before sending the invoice, you have the option to preview it. This allows you to see how it will look to the recipient and make any necessary adjustments or edits.
Revenue Base Item: To add the base type as "Flat rate" or "Per Loaded Mile," click on +Add Base Item. This section displays the revenue that comes from hauling the load. You can expand it by clicking on the down arrow button to view the Base rate and base amount set for the load.
- Flat rate: It represents a fixed payment for each load.
- Per Loaded Mile: It denotes per mile pay for any loaded runs performed.
Delete Revenue: If needed, you can delete the revenue by clicking on the three dots next to the Revenue option.
Add Accessorial Item: By clicking on + Accessorial item, you can include additional line items such as Fuel surcharge, additional stop, Detention, Lumper, etc. The value can be set to the default unit of the accessorial item defined in the "manage type" section, or it can be expressed as a percentage (%).
Invoice Settings: This section allows you to add or update important details such as the customer's name, contact information, invoice terms, load completion date, load miles, empty miles, and more.
Factoring Information: In this section, you can choose the Factoring company, set the Factoring Commission, write a personalized message on the invoice for the customer, and determine which documents should be attached to the invoice.
Tracking:
The tracking page presents a timeline and map view of the Load's details. External users, such as customers and carrier contacts, can track the load from this page.
Share the link: Sharing the tracking link is simple. Just click on the "+" symbol and enter the name, email, or phone number of the person you want to share it with. The recipient can click on the tracking link to access a new page displaying the load timeline and map view.
Copy the link: You can easily copy the link to your clipboard by clicking on the copy symbol.
Notes:
Users with Power Dispatcher, Dispatcher, and Accountant roles have the ability to add notes on a Load. When creating a note, you can attach multiple files by clicking on "Click Here to Upload a Document."
These notes can also be shared with the driver by clicking on the wheel symbol. When shared with the driver, the wheel turns blue.
Documents:
This section explains the various documents that are stored in the system and how to manage them. It includes load-related documents such as rate confirmation documents, bills of lading, and proof of delivery; driver-related documents like driver's license and TWIC card; and asset-related documents such as the tractor/trailer's license & registration document(s) and insurance papers.
Upload a document: To upload a document, simply click on the plus symbol (+) and select the document type you want to upload.
Share the document with the driver: Uploaded documents can be shared with the driver by selecting the documents, clicking on the share button, and entering the driver's email address.
Download the Invoice: If you prefer to have a copy of the invoice on your device, you can download it by clicking on the download symbol.
Preview the Invoice: Before sending the invoice, you can also preview it to see how it will look to the recipient. This allows you to make any necessary adjustments or edits.
Revenue Base Item: To add the base type as "Flat rate" or "Per Loaded Mile", click on +Add Base Item. This section shows the revenue that comes from hauling the load. This can be expanded by clicking on the down arrow button that shows the Base rate and base amount set for the load.
Flat rate: It is a fixed payment on each load.
Per Loaded Mile- Per mile pay for any loaded runs performed
Delete Revenue: The revenue can be deleted by clicking on the 3 dots next to the Revenue option.
Add accessorial Item: Click on + Accessorial item to add line items like Fuel surcharge, additional stop, Detention, Lumper, etc
It can have the value of the default unit of the accessorial item defined in the "manage type" section. It can also have "%" as a unit.
Invoice Settings: This section provides the ability to add or update important details such as the customer's name, contact information, invoice terms, load completion date, load miles, empty miles, and more.
Factoring Information: In this section, you can choose the Factoring company, set the Factoring Commission, write a personalized message on the invoice for the customer, and determine which documents should be attached to the invoice.
Tracking
The tracking page displays the details of the Load in the form of a Timeline and Map. External users such as customers, and contacts of carriers can track the load from this page.
Share the link: Sharing the tracking link is easy. Just click on the "+" symbol and enter the name, email, or phone number of the person you want to share it with.
Clicking on the tracking link will open a new page that displays the Load timeline and map view.
Copy the link: You can easily copy the link to your clipboard by clicking on the copy symbol.
Notes
Users with Power Dispatcher, Dispatcher, and Accountant tole roles will have access to add notes on a Load. The user can attach multiple files on Create Note page by clicking on "Click Here to Upload a Document"
These notes can also be shared with the driver. To share the notes with the driver, simply click on the wheel symbol. When the notes are shared with the driver, the wheel turns blue.
Documents
This section describes the various documents that will be maintained in the system as well as how to maintain them. This includes load-related documents such as rate confirmation documents, bills of lading, and proof of delivery; driver-related documents such as driver's license and TWIC card; and also asset-related documents like the tractor/trailer's license & registration document(s), insurance papers, etc.
Upload the document: To upload a document, simply click on the plus symbol (+) and choose the type of document you want to upload.
Share the document with the driver: Uploaded documents can be shared with the driver by selecting the documents>click on the share button>>enter the email address of the driver>>Send
Additional Details
This tab captures the following details:
Equipment Type: This section offers a comprehensive list of equipment types that can be utilized for a load, depending on the nature of the goods being transported.
Load Type: The user has the option to select whether the load type is Less Than Truckload (LTL) or Full Truckload (FTL).
Notes for Dispatching: You can leave the dispatching notes for the driver.
Commodity: Commodity refers to the specific product that is being transported in the load. It is important to provide details about the commodity to ensure proper handling and transportation. This section allows the user to add details of the commodity of a load. Read more about Commodity here Commodity
Activity
This tab captures different activities at an organizational level and creates transparency for the admin users. Read more about load activity here. Activity logs